Whether you’ve been cycling for a while, or you’re new to the cycling world, we’re sure you’ve heard terms used in reference to these classes. There’s a chance that you’re not sure what they mean, even as you sit on a bike in the class.
Well, fret no more, we’re here to give you guidance for the next time you jump on the saddle- that means seat. See what we did there?
Here are the key terms you’ll need to know when it comes to the “cycling lingo”:
Position: This is where your hands are placed on the handlebars. A lot of studios have three variations of this. The first as at the base of the handlebars, the second is on the outside of the handlebars, at the base, and the third is on the top two points at the end of the handlebars. For the most part at H2L, we encourage you to hold the base and keep your head and chest lifted.
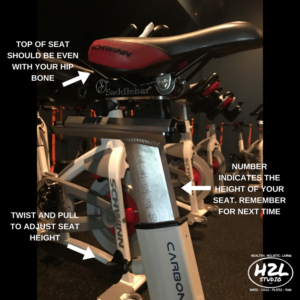
Set up (bike fit): This is the adjustment of your bike to your body. When you stand beside the bike, the saddle should hit directly at the hip. If you are unsure if it’s right, lift your leg to hip height and line the seat up with the top of your thigh. The handlebars should be level with or higher than your set, so your spine stays neutral.
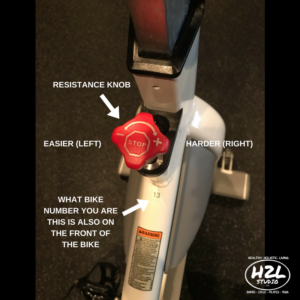
Resistance: It’s the red knob on the frame of the bike. We’ll use this during class to make the wheels heavier. This means the more resistance you add (turning the knob to the right) the harder you have to work to move the pedals. On low resistance (turning the knob to the left), it should feel fairly easy. On maximum resistance (turning the knob to the right), it will feel like you’re pedaling through mud, and that is not an easy task.
Saddle: It was said before- this is your seat. If you’re riding out of the saddle, and you will, you should almost always be right under your hips. You want to make sure your knees are behind your red knob in order to tell if you’re in the right position.
Tap-back: This move is done out of the saddle while sliding your butt about two inches back and two inches forward while activating your core. You get that rocking out feeling while riding since everyone is doing it in unison.
Right/left: A direction used to get everyone on the same pedal stroke in accordance with the music’s rhythm. “Right” is when your foot strokes down on the downbeat, followed by “left” in equal rhythm.
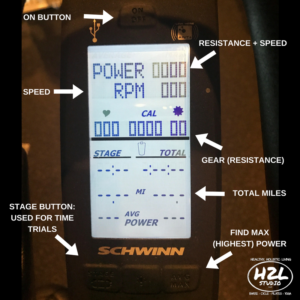
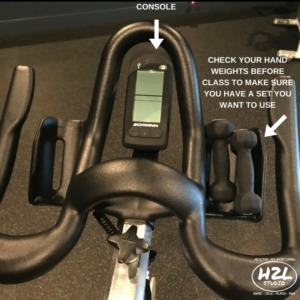 Console: This is the little black computer looking screen on your handlebars. We use this for different drills (activities in class). Here’s a little more info on what the console will read you.
Leaderboard: The big screen behind the instructor. Class start with you finding which bike you have been assigned to. It’s important that your name matches your bike because we email you your results! A great way to track your progress!
Power: This number will let you know how hard you are working. It’s the combination of how much resistance you have on your bike, and how fast you are moving the pedals. On our Leader Board, this number is referred to as “WATTS”. Please know that the POWER number on your console and the WATTS on the screen, are the same thing.
Sparknotes: Power = how hard you are working
Spinning: Most people refer to indoor cycling as “spinning.” Spinning is actually a specific style of cycling which was trademarked by Mad Dogg Athletics. Here at H2L we respect “spinning” but technically, our bike room has Cycling Classes.
Basket or Cage: This is the strap attached to the pedal that you slip your sneaker into.

If you’re still unsure and have more questions, feel free to reach out one of your cycling instructors the next time you’re in for a ride! We are more than happy to meet with you and figure out the best setup for your body so your ride is comfortable.